How to File KRA Returns with a P9 Form
A detailed step-by-step guide to filing your KRA tax returns using a P9 form

Filing tax returns is an annual activity required by tax authorities, in this case, the Kenya Revenue Authority, KRA, for all individuals eligible to pay tax in Kenya i.e., those employed and those not employed. For those who are unemployed, they are expected to file nil returns while for those in employment, they are required to file KRA returns with a P9 form. Here's a detailed step-by-step guide to filing your KRA tax returns using a P9 form.
What is a P9 Form?
A P9 form is essentially a tax deduction card provided by employers to employees that includes the total emoluments that they have received in a particular year, for the purposes of filing tax returns.
Emoluments are the benefits employees receive for work done including their basic salary, allowances, benefits, gross pay, tax reliefs, pension contributions, and other benefits. The P9 form acts as a summary of the total benefits the employee has received from the employer and is essential in helping the employee file tax returns.
What Information is Contained in the P9 Form?
The P9 form includes all the emoluments an employee has received from an employer for an entire year. This includes basic salary, gross pay, pension contribution, allowances, benefits, tax reliefs and so on.
The P9 form also includes the employer's tax details including the employer's name and the tax pin, in this case, their KRA PIN. All these details will be input into the tax return filing process.
A P9 Form is divided into numerous columns denoted by letters starting from Column A all the way to Column L. At one end of each column are the totals and these are very essential in filing KRA returns using a P9 form.
Where Do I Get the P9 Form?
The P9 form should be provided by your employer every year, mostly in the first few months of the year, to allow you enough time to file your tax returns for the previous year and before the set deadline. The deadline for filing KRA returns in Kenya is on June 30th each year meaning that you have to file returns for the previous tax period (from 1st January the past year to December 31st that year) on or before June 30th in the current year.
The Process of Filing KRA Returns with a P9 Form
To file your KRA returns using a P9 form, ensure you first get the form from your employer and then follow these steps:
I. Head to the KRA iTax Web Portal on itax.kra.go.ke.
II. Enter your KRA PIN and Password and answer the arithmetic challenge (for security purposes and to ensure you are human).
III. Once you are logged into the KRA Portal, hover your cursor on the 'Return' option on the top horizontal menu, and a drop-down menu will appear.
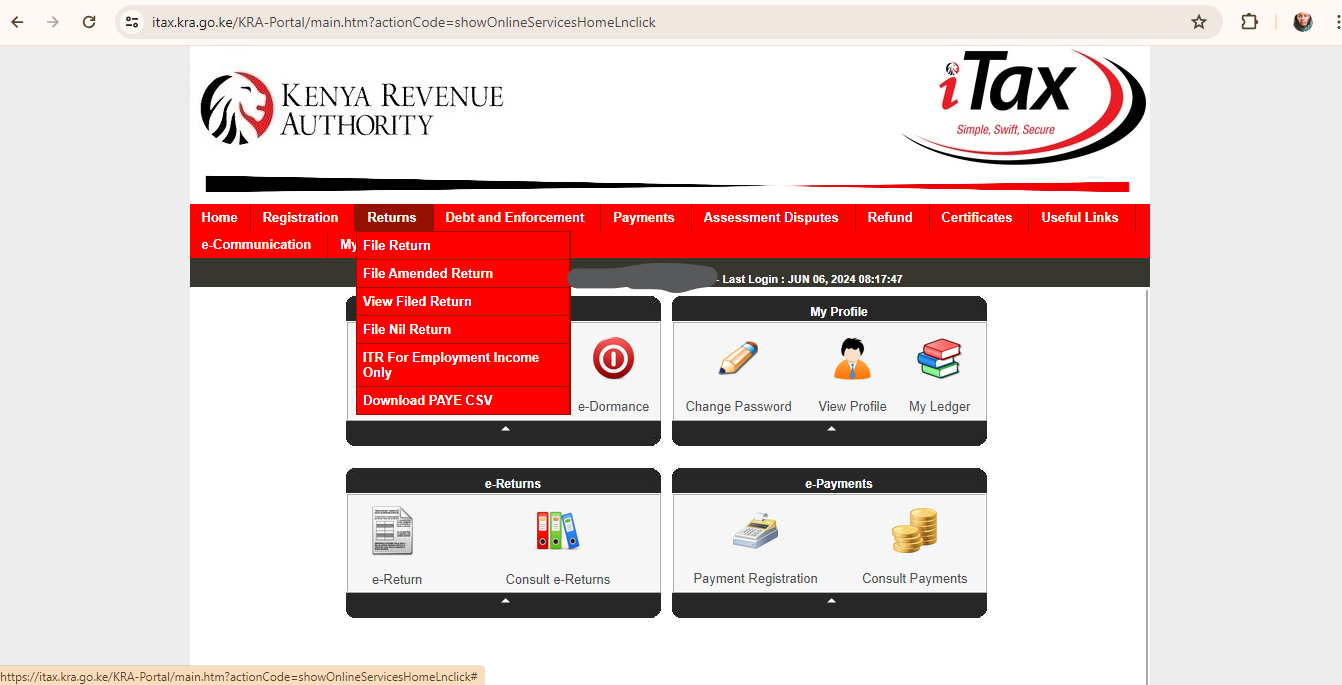
IV. Click on ' File Return' and you will be taken to 'e-Returns'.
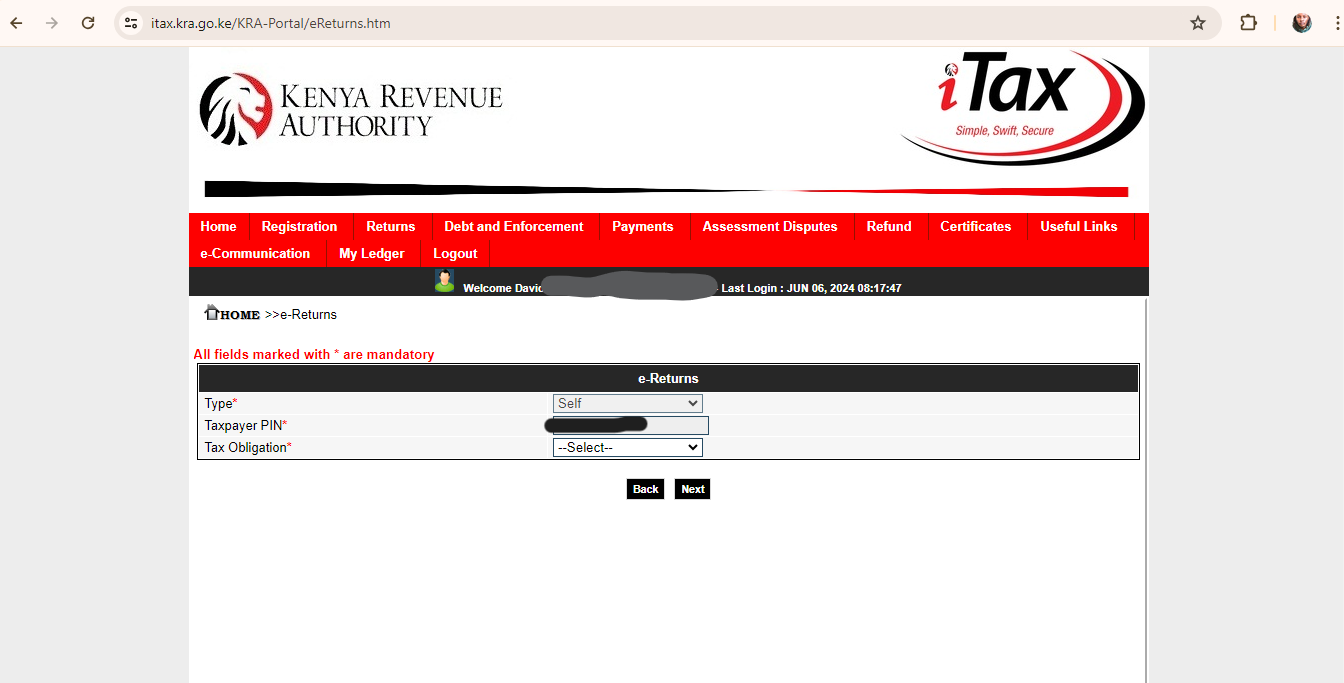
V. Select the 'Tax Obligation' which should be 'Income Tax - Resident Individual' if you are a Kenyan citizen or 'Income Tax - Non-Resident Individual' for foreigners. The return type which is typically 'Self' and your KRA PIN are automatically selected for you and cannot be changed.
VI. You will be taken to the 'Income Tax - Resident Individual Form' where you will download the form. The form comes in the form of an Excel sheet or an ODS form and you can download either from this page. You'll see a link to download the form just below. Download the form for Excel and then wait for it to be saved on your computer.
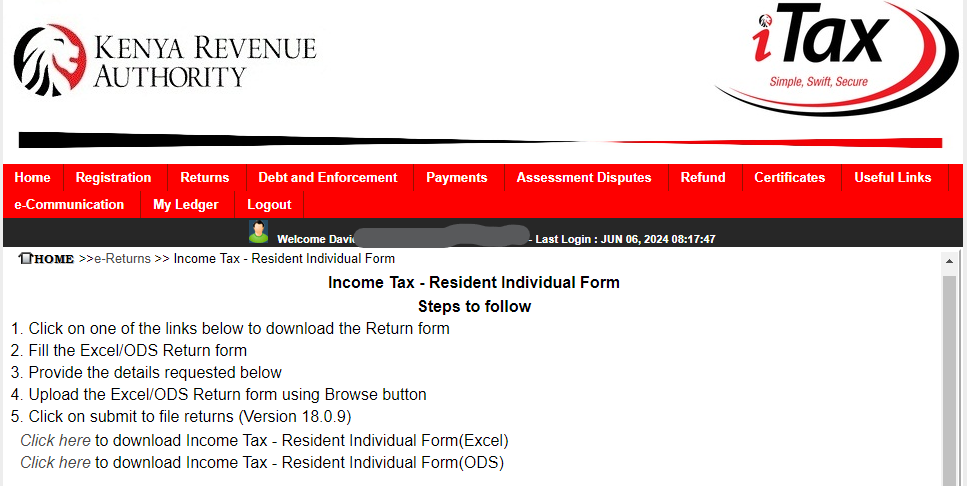
VII. The downloaded form will be inside a . ZIP file that will be named 'IT1_Individual_Resident_Return_XLS'. Unzip the file using a tool such as WinRAR and open the folder where you have unzipped it.
VIII. Open the Excel file that you have extracted from the ZIP file, which will also be named 'IT1_Individual_Resident_Return_XLS'.
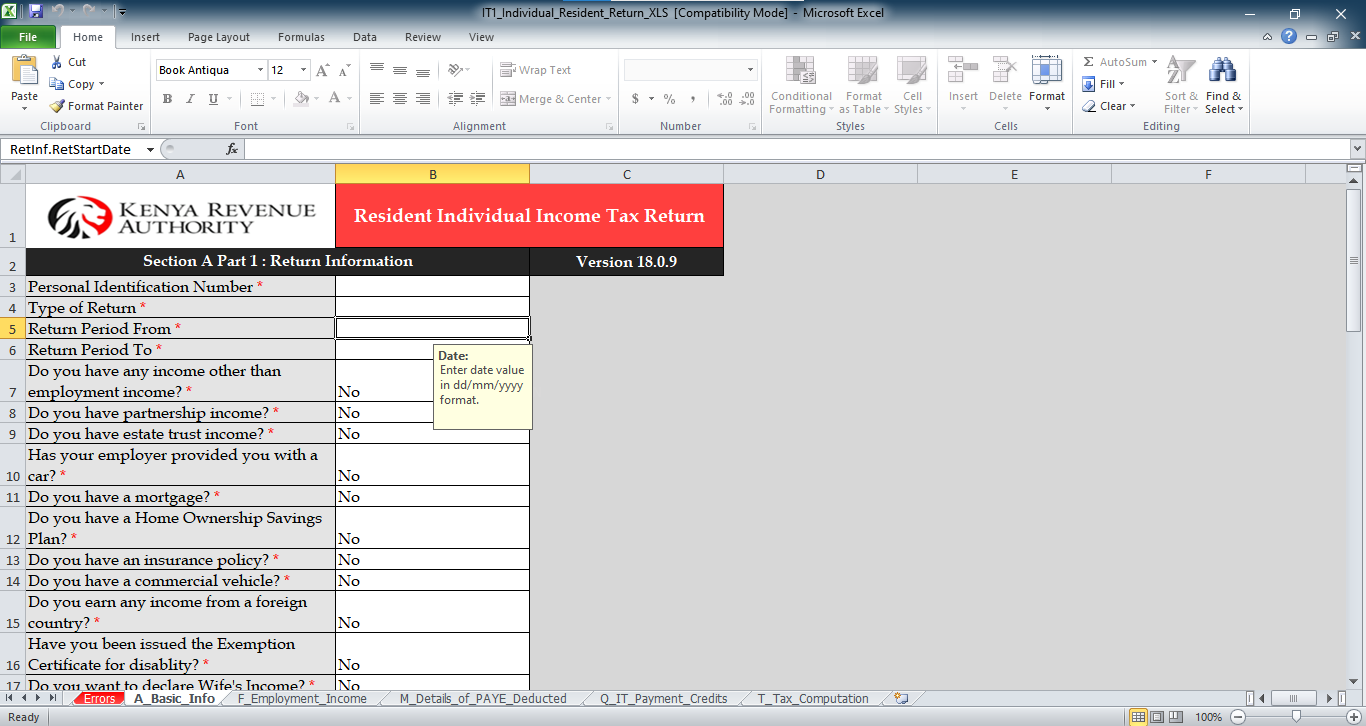
IX. Before doing anything else, you may see that the file is locked for editing on Microsoft Excel and the first thing you do is click 'Enable Editing' to allow you to edit the file and enter the required info.
X. You may then see another error "Macros have been disabled". Right next to the error click 'Enable Content' which means you will enable Macro content. Excel programs such as MS Excel sometimes lock editing and disable Macros for files downloaded from the internet as a security measure.
XI. After doing this, you can now edit the Excel file and you will get a message asking you not to cut or paste any items from the workbook (the form as an Excel file). Please ensure that you do not do this as it could ruin the form and you'd have to download another one and restart the process. You'll note that the file contains several worksheets, seen as tabs in MS Excel and they include:
- ReadMe (A worksheet or page with instructions on how to work with the form).
- Errors (A page that will show you the errors you've made if any).
The most crucial worksheets, however, and the ones where you'll input the details are the following.
- A_Basic Info (A worksheet where you'll enter your basic information).
- F_Employment Income (A worksheet where you'll enter details of your employment emoluments)
- M_Details of PAYE Deducted (A worksheet where you'll enter details of any Pay-as-you-earn, PAYE tax that you have been deducted).
- Q_IT Payment Details (A worksheet where those who have paid income tax in advance can enter the details of the tax paid).
- T_Tax Computation (A worksheet that will show the final computation of the tax you ought to pay or be refunded as per the details you enter in the worksheets above).
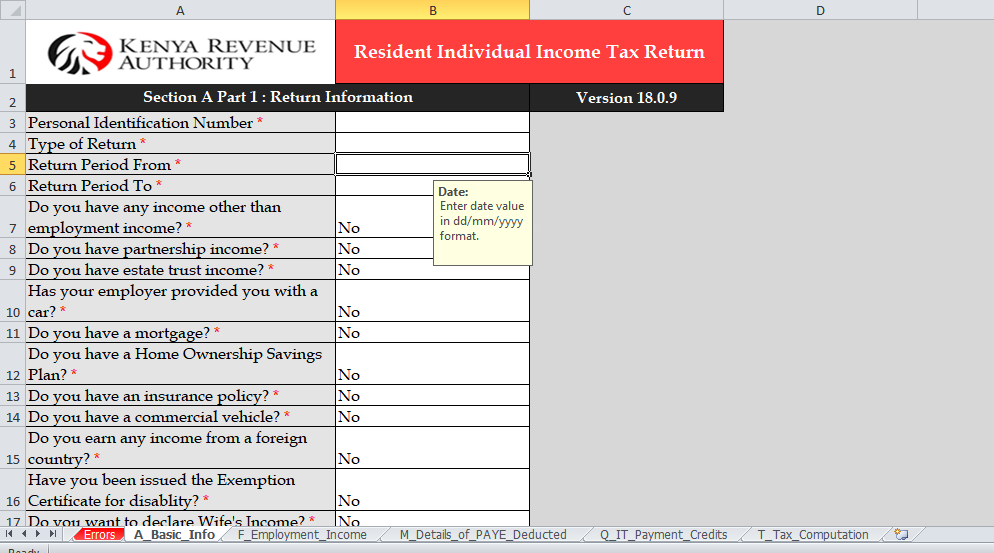
XII. Go to the 'A_Basic Info' worksheet and enter the following.
- Your KRA PIN.
- The type of return. This is essentially asking whether this is an 'original' or 'amended' return. An original return is when you are filing the return for the first time. An amended return is when you are filing the return again maybe due to an error made before or any change that is necessary to be made after you had already filed your returns.
Please note that if you file returns and then realize you've made a mistake, you will not put in 'Original' as the type of return as it only applies to the first time you are filing. Instead, the type of return you will input will be 'Amended' as you will be redoing it again. You can select the return type using a drop-down at the end of that row. If you are filing an amended return, you can refer to the video guide below.
- There will be other fields that are required (marked with *) in this worksheet but most will be prefilled as 'No' and include details that people with other established sources of income or foreign income would need to enter. Skip those if you only have employment income.
XIII. Scroll down in the worksheet and click on 'next'. This will take you to the 'F_Employment Income' tab where you'll enter some more details including the following.
- Details of employment income (self) where you will enter the name and PIN of your employer and also your gross pay. Find more guidance on where to find this information in the P9 form below.
How to Get the Information You Need to File KRA Returns from the P9 Form
To source the information you need to enter in the 'Income Tax-Resident Individual Form' from the P9 form, you'll need to note the following.
- Always use the totals of each of the columns in the P9 form. They usually are the total amount of each of the columns for the whole year and this is what is needed by KRA and NOT single-month amounts or amounts within the column.
- You need to use the key or guide below on what information to get in what column. Here's the guide:
Key: you'll get this info in, - this column (the total)
Gross Pay – Column D.
Taxable Salary – Column H.
Tax Payable on Taxable Salary – Column J.
Amount of Tax Deducted (PAYE) – Column L.
Defined /Pension Contribution – Column E2.
Personal Relief – Column K.
- Please be very careful not to enter the wrong information as this could mean repeating the process and probably getting into trouble with KRA.
If you have other benefits such as car allowance, housing, and pension in excess of 300,000, you can also enter these but for the average person, you can leave those as they are. There are also rows for details of employment income for your wife for those who have a KRA tax link with their spouse.
PS: If you have other incomes beyond employment income, you can refer to the video below for more instructions.
XIV. From there you will click on 'next' and go to M_Details of PAYE Deducted. On this worksheet, you will find the 'Details of PAYE Deducted at Source from Salary' where you will fill in your taxable salary, tax payable on taxable salary, and amount of tax deducted (PAYE). You will find each of these amounts in the P9 form with guidance from the key above. Fill these amounts in Kenya shillings and do not include a comma or other symbol.
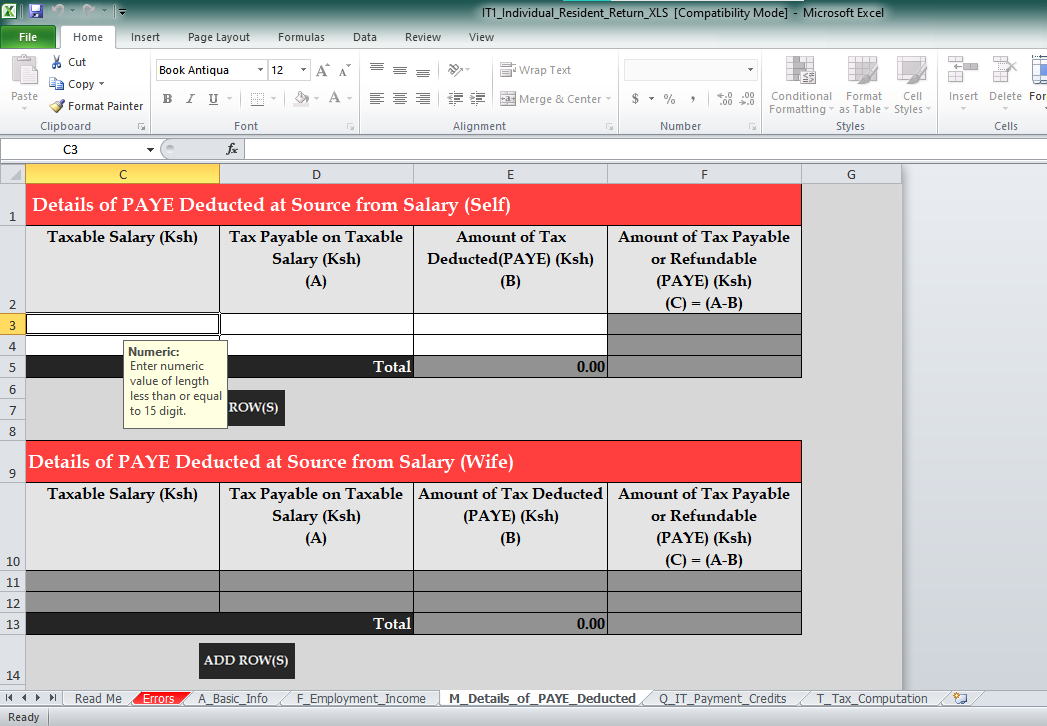
XV. After you are done, you will scroll down in that worksheet and click on 'next'. This will take you to Q_IT Payment details. This worksheet is only for those who've paid tax in advance and you can ignore it if you have not. If you've paid tax in advance, refer to the video guide below for more.
XVI. Click on 'next' and you will be taken to T_Tax Computation. Here you will need to enter your 'Defined/Pension Contribution' and 'Personal Relief' down a bit which is the amount of relief from tax provided.
A tax relief is essentially an incentive that reduces the amount of tax an individual has to pay. The information you need to enter will be sourced from the P9 form as stipulated in the key above. The following fields in this worksheet will be prefilled and you do not need to worry about them.
XVII. After you are done, scroll to the bottom of the worksheet and click on 'Validate'. This will compile the information in the entire workbook and if there are no errors, it will prompt you asking whether to create a zip version of the form. This is what you'll upload on the KRA Portal, right where you downloaded the initial form.
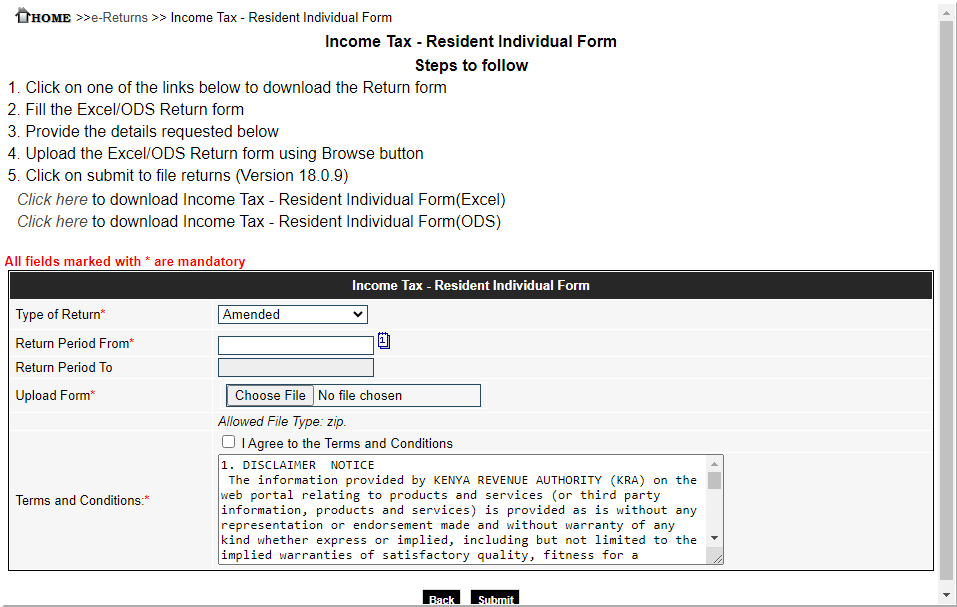
XVIII. Once the file has been created, go back to the 'Income Tax - Resident Individual Form' page in the KRA portal right where you downloaded the initial form, and scroll down. There you'll see the place where you'll upload the form.
You'll need to select the return type (original or amended) and enter the return period (1st Jan for that year to 31st Dec). You'll then see an 'upload form' box which you'll click and select the form from your computer. Once done, tick the 'I Agree to Terms and Conditions' check box just below the box and then scroll down and select 'Submit'.
XIX. Once that is done, the returns that you've filed using a P9 form will be uploaded and will be submitted to KRA as a filed return. You'll then be taken to a page where you can download an 'e-Return Acknowledgement Receipt', essentially proving that you have filed returns.
XX. Download the receipt and store it well in case of anything. You are done filing KRA returns with a P9 form. You're a champ! Phew, you can now relax and wait for next year to file the returns for this year.
How to File Nil Returns
To file Nil returns, the process is rather simple. Note that only those without employment income or other declared and taxable income can file a nil return.
The steps for filing a nil return with KRA are as follows.
- Head to the KRA iTax Web Portal.
- Enter your KRA PIN and Password.
- Once in, hover your cursor over 'Returns' and select 'File Nil Return' in the dropdown menu that appears.
- You'll be prompted to enter the return type, taxpayer PIN, and tax obligation. The first two will be prefilled and you'll select 'Income Tax - Resident Individual' if a Kenyan citizen and 'Income Tax - Non-Resident Individual' if a foreigner and then click submit.
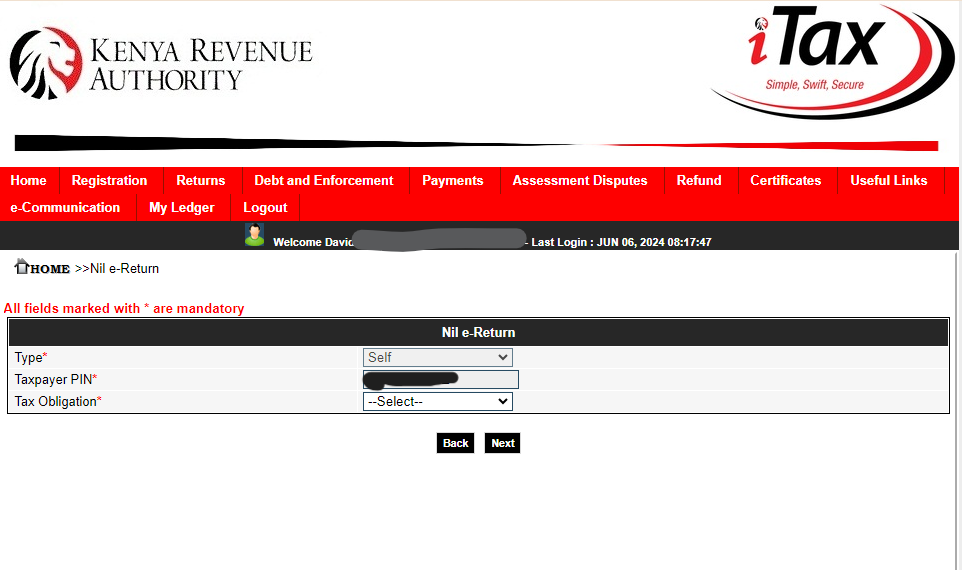
- On the next page, you may be prompted to enter the return period and if not, you'll receive an acknowledgment receipt showing you have filed a nil return. Simple as that.
Video Guides on How to File KRA Returns with a P9 Form
If you'd rather learn how to file KRA returns with a P9 form using a video guide, you can watch the video below if you are filing an original return i.e., doing it for the first time. This video will also assist those who have numerous incomes to declare beyond employment income, those who've paid income tax in advance, and those with extra fields to fill, as per their tax declarations and incomes.
If you want to learn how to file an amended return, watch the video below.
That's it. We hope you enjoyed our guide.

Read more guides and tutorials here
Hire Someone to File Your KRA Tax Returns for You
If you need personalized help filing your KRA returns using a P9 form, you can reach out to us at +254731048779 and we'll assist you for a small fee.




Comments ()